I had been wanting mail organizer for my main room for a long time. I loved the wooden looking ones from Pottery Barn, but there was no way I could afford that. I found this one at Target, and thought it was so cute.
I decided to try to make one and I loved the results!
It's such a cute addition to my apartment. I just love the pop of color with the burlap. I've gotten tons of compliments on it.
I decided to make another for two reasons. (1) My desk is always a mess with all the cards and letter that I can never decide what to do with. (2) I found this gold polka dot burlap fabric and just HAD to use it for something.
Here's what you will need:
-a picture frame (I just bought a really cheap one from Hobby Lobby when they have their big sale in the summer. Also, it's really helpful to buy one with the mounting hardware already on it.)
-1/2 yd each of two coordinating fabrics (I recommend using a heavier fabric)
-cardboard
-glue gun
-box cutter
-needle nose pliers
-tape measure
2. Now you are going to want to take apart the rest of your frame so you just have the wooden frame by itself. Use the needle nose pliers to pull out the staples that hold the cardboard backing in. (Save this cardboard though. It will be what you form your fabric around). Remove the glass.
 |
I had 3 sections on mine (2 pockets and the top section). The height of my picture was 15", so each section was going to be 5".
For mine, I cut a big piece of cardboard to match the width of the picture. Then cut a 5" piece and an 8" piece for the pockets.
5. Now it's time to cover the cardboard with your fabric. Use the fabric that you want for the top section and cut it so it will cover about half of the picture with a few inches on the top and sides to wrap around the cardboard.
And this is what the back will look like with all of the fabric folded and glued down to the back of you cardboard.
When you flip it back over to the front, it will look like this.
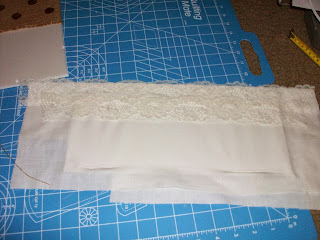
7. Now it's time to make your first pocket. Take your bigger pocket piece and cut fabric so it completely covers both sides of the cardboard with extra on the side to wrap around to the back. Use a little hot glue to hold in place. For mine, I also glued lace over the fabric.
8. Attach the pocket to main piece of cardboard. Place the top of the pocket the how ever many inches you first measured for your sections (so mine was 5" from the top). Wrap the sides of the pocket like you did with the first piece of fabric. I also found it helpful to glue the bottom of the pocket to the cardboard. This way your mail will never slip through.
9. Once the middle pocket is in place, do the same for the bottom pocket. for this one you will wrap around the sides and the bottom of the fabric. Wrap it tight! This is what it will look like from the back when it's all wrapped and glued.
10. It's time to put it in the frame! Sometimes it will be tough to get it back in the frame with all of the fabric, but it can be done. After I put mine back in the frame, it stayed put so I was able to hang it on the wall. If yours needs a little more stability, you can duct tape it or use nails to hold the cardboard in the frame. Just hang it up,and now you have your finished mail organizer!
 |
| My desk space. P.S. I cleaned my desk for this picture. It NEVER looks this clean. |
Hope this was helpful :)
Thanks for reading!
On a side note, most of the cards on my bulletin board were made by my sister, Sarah. She is INCREDIBLY talented.


.JPG)

Awwwwwww :)
ReplyDeleteAwesome tutorial! Love the lace and gold polkas so much.
Cute!!
ReplyDelete