Friday, December 19, 2014

Knock-off Crate and Barrel Table Runner

In September, Sarah and I went down to Kansas City to go to a bachelorette party.  Of course we had to do some shopping while we were down there. We met up with Sophia and Ginny and and spent a ridiculous amount of time at the newly opened Ikea.  This may be my new favorite place!


Another favorite place we were able to make it to was Crate and Barrel.  I could spend ALL day in this place.  Along with my new favorite french fry recipe book, (If you didn't know, fries are my favorite thing EVER) I found this great table runner.


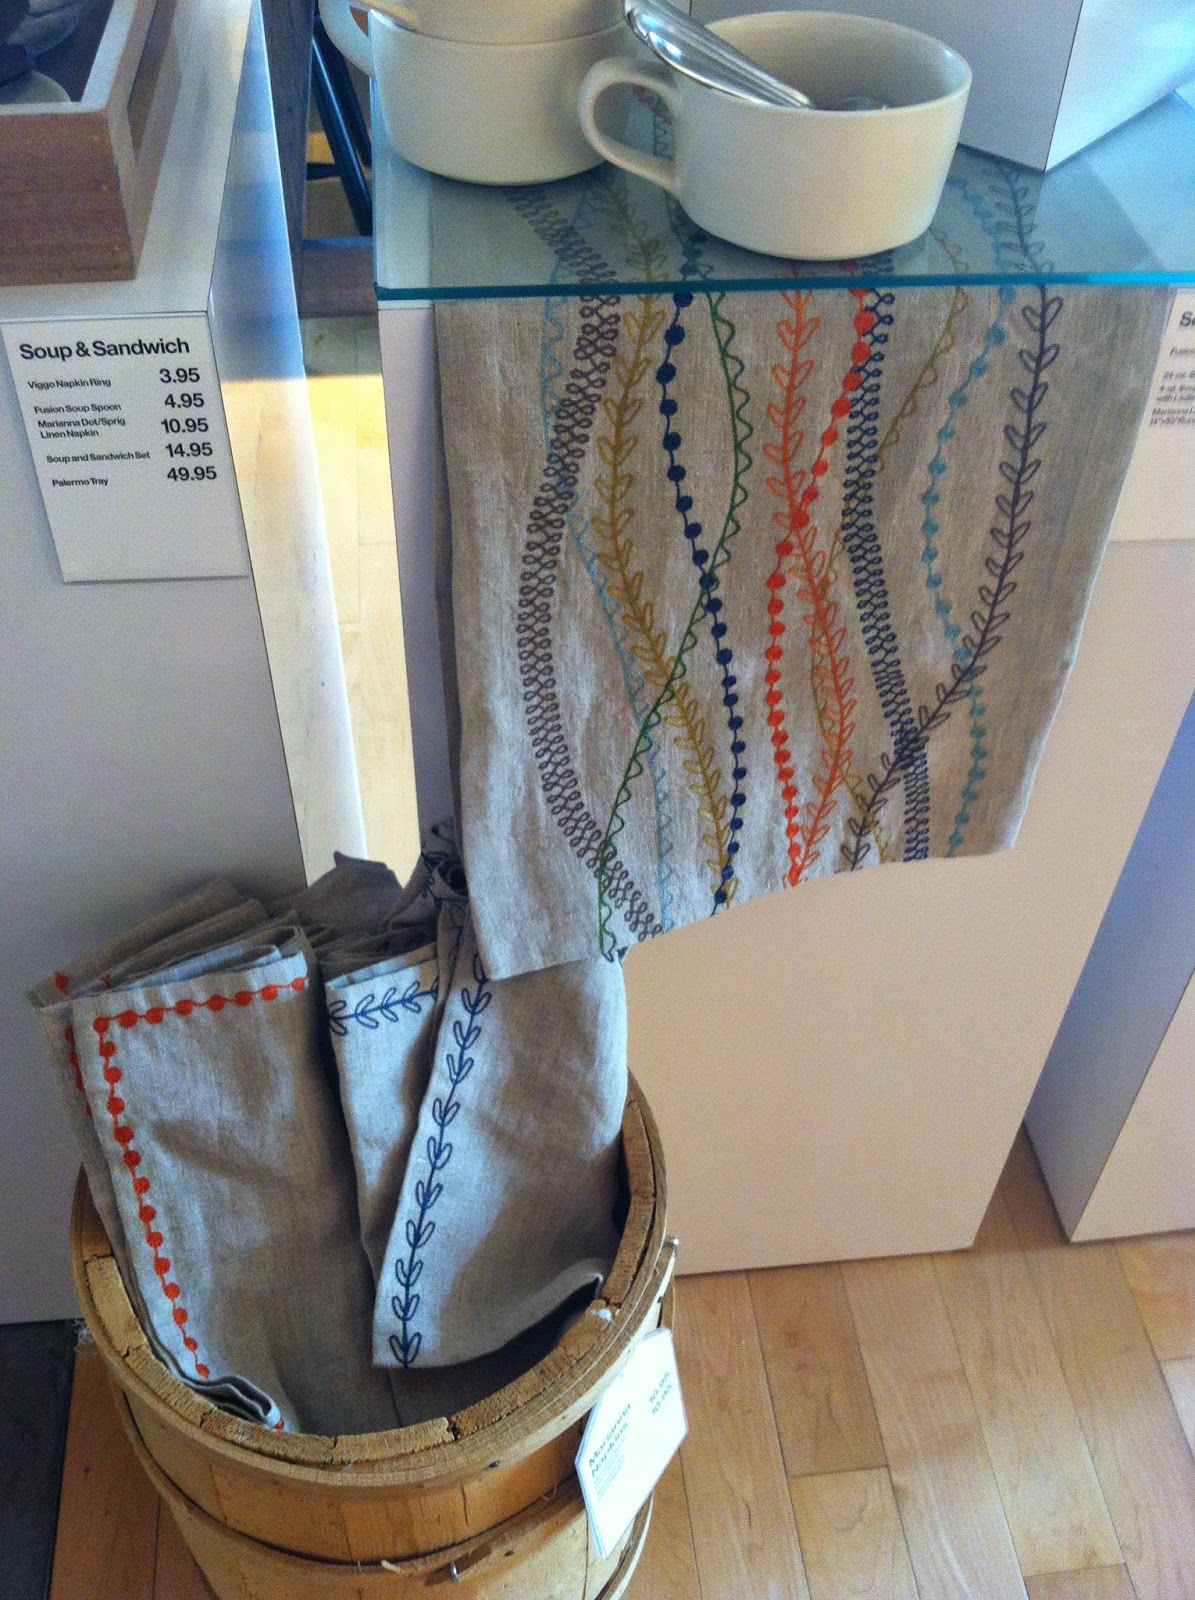
And then it was $70.  Yeah, not gunna happen.
How hard could it be to make?

Here's all you need:
-2 yards of linen or muslin fabric (I used muslin)
-thread matching the fabric
-7 to 10 different coordinating colors of thread


Decide how big you want your table runner to be and cut your fabric length and width one inch bigger.  (I wanted my runner to be 11"x 52" so I cut it 12"x 53.")

To make the finished hem, press each side of your fabric under 1/4".


Now press that under again so that the raw edge of the fabric is tucked inside.  Pin this down.

Mitered corners will give your runner a more finished look.  Open the corners of your pressed fabric so that you can see the pressing lines. 


Here I traced over the pressing lines with a water soluble marker so I could see them better.  Draw a diagonal line through the square that the pressing lines make so it goes to the edges of the fabric.


Now cut along the diagonal line.

Use your fingers to fold the raw edge of the diagonal over.

Refold the fabric edges so they match your pressing lines and fold the diagonal edge in to the edges match up like in the picture below.  Do this to all four corner and pin like crazy.


Your hem is all prepped. Just stitch it down.  The closer you sew to the open edge of your hem, the better the runner will lay flat on the table.

Now that you have the basic runner complete, it's time for the fun part!  Use your water soluble marker to draw curvy lines from end to end of the runner.  Make sure some of the lines overlap.  Luckily, this isn't supposed to be perfect!


Pick out which colors of thread you would like to use and the order.  If your sewing machine can do special stitches, you may want to spend time experimenting with sizes and which ones you like best. If you don't have all the fancy stitches, just using different sized zig-zag stitches would look great too.
Here are my notes:
P.S. If I can give any advice about sewing, it would be to keep a notebook with notes from all your projects.  It is SO helpful if I need to go back to find measurements, patterns, what stitches I used, etc.

Once you've picked out your stitches and colors just sew along those lines.  
This is a fantastic project for people who can't sew a straight line to save their lives. (**Slowly sinking down in my seat so I don't look guilty**  But seriously, don't ever ask me to sew a straight line.)

Sew over all of the lines you have drawn.  This was where I was originally going to end it, but decided to add a few more.

And once you are through with that, wash any visible marker lines out, dry, and press.  You are finished!


Sorry for the bad picture quality.  I really need to try to take these during daylight hours.


Thanks for reading!!

Tuesday, December 9, 2014

The last few weeks...

Hello again.  And even after I promised myself to start posting more often, I failed.
I thought it was about time I shared some updates on my life.

The most significant thing that happened this last month was that my dad was in a bad accident.  He was sorting cattle on November 19th.  He went to pull the end gate off of the truck and the wind took the gate and brought dad down with it.  He landed on his face and his arms went numb for a second.  He was able to get up and walk around, but was in a lot of pain.  In normal farmer fashion, he decided to not go into the ER that night.

The next day the pain was worse, so he finally gave in and went to see the doctor.  After an x-ray and a CT scan, they determined that he had fractured his C2 vertebrae.  (This is a HUGE deal.  This level of the spinal cord can affect everything neck down, including breathing.)  He got a helicopter ride to Nebraska Medicine in Omaha and they put him strict bedrest until they could do surgery.  November 21, they did surgery to put a screw through the broken piece of the bone. He had a couple more days in the hospital and now has to wear a C-collar for 6 weeks.  He can't lift over 20 lbs, drive, and has to take it pretty easy when doing chores, but compared to what could have happened this is nothing.  We sure had a lot to be thankful for this Thanksgiving!


On a lighter note, I just got back from a weekend in DC!  It was great, but way too fast as always.  We started the registering for gifts process.  Once we got started, we had a blast! It's like a shopping spree, but you don't actually have to spend any money.
Patrick and I have had the worst time trying to find time to take engagement pictures with our photographer, but we found an almost-as-good substitute:

Who knows, this may be the only save the date we have.  Thank heaven (haha) one of us lives where 7-Elevens exist!

Thanks for reading!

Tuesday, November 18, 2014

Homemade Runzas

And after a long break, I am back with another post.

I feel like I have been so busy lately! Keeping up with my new jobs, wedding planning, and various craft projects have been filling my day.  Important things I want to remember about this time of my life:
1. I found a wedding dress!! I love it! I am so so so relieved to finally be able to stop looking for one though.
2. I've really started to settle into the routine of my job (inpatient acute).  The first few weeks of the job were pretty rough, so I am relieved to be feeling more comfortable with being an OT.  I am also working one night a week at an outpatient pediatric clinic.  This OT thing is pretty great!
3. I cannot wait to share my latest craft projects :)

If you're from Nebraska, Runzas are a staple.  Beef, cabbage, sweet bread.  Life doesn't get better.
Here's an easy Runza recipe for those of you that happen to be living in Arizona and don't have Runzas around (or anywhere else outside of the Midwest for that matter).

*Fun Fact of the Day* Schuyler actually used to have a Runza Restaurant.

Dough:
-5 cups of flour
-1/2 cup of sugar
-1 tsp salt
-2 pkgs dry yeast
-3/4 cup milk
-1/2 cup water
-1/2 cup shortening
-2 eggs

Heat milk, water, and shortening until warm.  Add 1 3/4 cup flour, sugar, salt, and yeast.  Add eggs.  Use electric mixer to blend the mixture.  The blend for 3 minutes on med speed.  Stir/knead in rest of flour.  Cover with towel and let dough rise ~40 minutes.


Filling:
- 1lb ground beek
-1/2 cup chopped onion
-2 cups of cabbage
-2 Tbsps butter
-1/2 tsp salt
-1/8 tsp pepper

Brown beef and onions.  Melt butter in saucepan and add cabbage.  Cook cabbage till soft, stirring often.   Mix cabbage and beef mixture together.


Once your dough has risen, take a golf ball sized piece and roll it out.  You want to roll this pretty thin.


Spoon the beef cabbage mixture onto it.


Fold up and pinch the edges.

Flip over so the seams are on the bottom and place on a baking pan.  Do this for the rest of the dough and beef mixture.


You're supposed to let them rise for another hour at this point, but if you're really  hungry, I would just say to go for the gold (exactly what I did).

Bake them at 350 degrees for 20 minutes or until golden.

Delish!!

Normally I dip them in ketchup, but guess which brilliant sisters never thought to buy ketchup?

The whole batch made about 10 of them.  I ended up just baking 2 and wrapping the rest in aluminum foil to freeze.

Thanks for reading!

Monday, October 20, 2014

My Summer Projects

After Sarah and I moved into our apartment in April and I was able to set up my permanent sewing corner, I decided to really make an effort to sew more clothes this summer.

Here are some of the projects I worked on this summer:

I made this dress to wear for graduation in May.  I had been obsessing over Peter Pan collars at the time and wanted a dress with one.  This project was definitely challenging for me.  Thank goodness my mom was available to give me some good pointers..


I made this peplum top for a wedding this summer and paired it with this skirt.  With the seven weddings I had this summer, it was a nice change from my normal girly dresses I wore for all the others.


I got caught up in the pleated skirt phase after I saw this post from the Pink Peonies blog.  This was what I worked on during my boards study breaks.  It was the first piece of clothing I made without a pattern.  I love how it turned out.  


Do you remember when Taylor Swift announced her Red album?  She was wearing this gorgeous number.  I happened to stumble across similar fabric at Hobby Lobby and decided to try to copy it.  I also made this one without a pattern.  When I was all done, I was so mad at myself for not adding pockets! haha Other than that, I love it and have worn it tons since I finished it.


I'm hoping to keep working on more clothes soon! 
Speaking of Taylor Swift, who else is freaking out that her new album is coming out next Monday?!? 

Thanks for reading.

Tuesday, October 14, 2014

DIY Tassel Garland

So my bedroom makeover has been a very long, slow process.
I started with my coral and gray color scheme that I had since living in KC.  
And I still like it, but after a couple years of so much pink I was ready for a change.

I poured over a million different Pottery Barn pictures and decided to do a cobalt blue/white/neutral color scheme.  You've seen my new nightstand and new pillows in my previous posts, but I still needed to do something with the headboard.  After a million more Pottery Barn pictures, I decided to make the headboard neutral too. (All I did to make this headboard was cover the inside of these frames with fabric and quilt batting.)


So then I felt like it looked much more mature, but there was so much empty space going on.

Enter the tassel garland.  I have seen them all over the place, and thought it would be a great (and really cheap) way to bring some more color in.


Here's what you need:
-fabric in the color(s) of your choice
-scissors or a rotary cutter (the rotary cutter really cuts down on your time---no pun intended)
-floral wire
-twine
-wall hooks


I decided that I wanted my tassels to be 8" long with about a 2" loop.
I cut each piece to be 20"x 9".

Fold it in half.

Cut 3/4" x 8" strips.  Do not cut through the folded side.


Open the fabric strips and roll the fabric at the uncut portion.

Fold the tassel over to make a loop.

Tie the loop off with floral wire.

Cut the excess wire off.

Use an extra strip of fabric to tie around the loop to hide the wire.

Now do that for all of the tassels you want.

Lay them out in your preferred order. 
(You have no idea how much time I spent making the order look random.)

String them onto the twine.

Attach the hooks to the wall and string the garland onto the hooks.

And here it is! 

I'm still on the hunt for a different lamp and considering adding a couple of these prints above the garland too, but I'm getting closer!

Thanks for reading :)